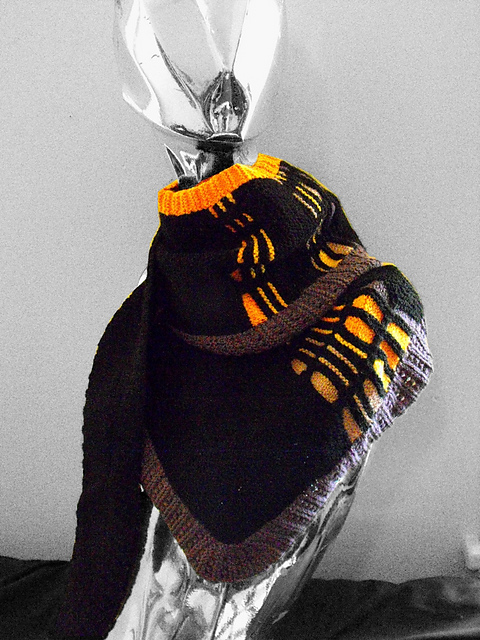
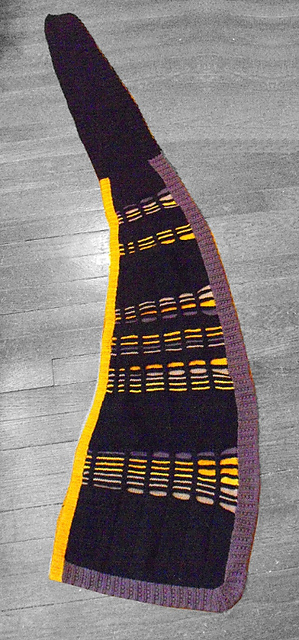
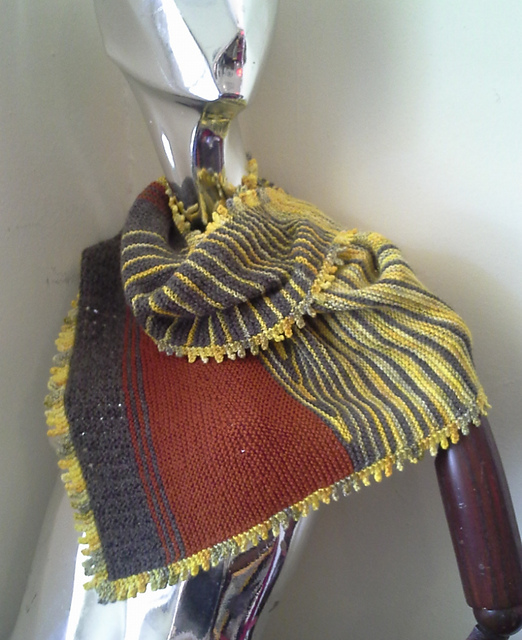
Sunday, December 30, 2012

New projects..mumble...grumble

Let's just pretend I never mentioned the aforementioned gray stockings.  They are oh, about three sizes too big and need to be completely reworked.  They've been in a knitting bag mocking me for months now and I'm too annoyed to bother.  Meh. 

I still want to redo the blog layout and clean up old dead links or whatever.  Meh again.  Steambustle.com is being reworked into a print version with entirely too many illustrations and graphics.  A novel is eating what's left of my brain and it's in an interminably long editing stage.  A couple people are reading the thing and probably ruing the day I was born. 


I do have three new projects on Ravelry to show you guys.  Yeah, I just now got around to joining Ravelry. Time travels in reverse here, OK?


All my Ravelry patterns will have links here and I'll keep posting free vintage patterns at the Stitch-O-Rama.  I'll have the occasional new free design but I'll keep my prices low on the others. 

I get use that hateful program from work to make my pattern layouts.  Awesome.  Don't even ask me how
much I despise that thing, but it's free so whatever.

Saturday, August 27, 2011

Hurricane Plans


My plans for this weekend's hurricane involve finally (stop laughing!) writing out the pattern for the oft-promised gray lace stockings. After a few hours of digging I found the original scribbled notes that got lost in the complete disaster I've gradually let happen while I fight with this accursed novel. I've been intending on doing a nice layout in a pdf file for easier downloading and printing, unless the power goes out and I'm sitting here for the next couple days in the dark listening to the wind blow.

The black lace ones have been put on the back burner for the moment because the cotton/wool blend yarn didn't have enough wool in it for stockings. I was trying to make some summer lace things, and thought I had the perfect yarn but it had absolutely no memory whatsoever. I'd try them on, they'd stretch a little, and after maybe four times of briefly trying them on they'd grown large enough for me to but both legs into. There was no point in writing out the pattern and saying, "Hey, use better yarn, OK?" Yeah, that would've been an awesome pattern.

I think I can get a little design work going on some things I've had ideas for but haven't had the time to work on. I'm not in a novel-writing mood today so I might dust off the knitting needles and pick the cat hair off some yarn. Lots and lots of cat hair.

Monday, February 22, 2010

Questions and Comments and Suchlike Plus A Straight Jacket

Sorry to anyone who has posted a comment with a question or suggestion--my comments don't connect to my email so I tend to find them much too late. Have a go at my email in my profile and I'll get back with answers pretty fast.

I did find an intriguing question by Jess in my comments today while I was looking for a pattern to link to and it was about finding a straight jacket pattern or making up one.

Have you seen the book Naughty Needles? There's a straight jacket inspired pattern in there with extra-long sleeves that fasten in the back with a D-ring on one sleeve and a metal spring clip on the other. But you could find a sort of plain, unadorned sweater pattern, lengthen the bottom and attach a pair of D-rings at the back crotch and a knitted strap at the front if you don't want it to ride up and lengthen the sleeves maybe 10"-12" with a pair of D-rings on one sleeve end and a strap on the other to cinch them up. Or metal fasteners which might look more interesting when they're not fastened.

Yes, I'm tempted to whip one up right now. There are a couple of fetish-type things I'm in the middle of designing along with a cyber-gothic thing or two, now that the graphics rush at work is done and I can let my brain cool off again, so new patterns coming up in the next few weeks or so.

Yes, that is a threat.

Saturday, December 12, 2009

Starlight Evening Gloves


Starlight Evening Gloves (c)Severina/A Murphy

Formerly published at the now defunct Magknits.

Description of Design: Starlight Evening Gloves make use of a simple all-over eyelet stitch and a faggoting stitch "seam" as their focal point. They were designed using a stocking formula to create a glove that should fit nearly anyone--the resulting fit should make it worth the extra effort. While these very long gloves were knitted from a shiny rayon/cotton blend yarn, they could look equally elegant in a soft cashmere, and for a fun look try them in a glittery lurex. The pattern formula should lend itself to many yarn variations.

Difficulty Level: Intermediate
Materials needed: Sample gloves were knitted from eight ounces of rayon/cotton blend fiber hand spun into a shiny/nubby two ply yarn. One set of size 2 US (2 mm) double pointed needles. Stitch holders. Stitch markers. Tapestry needle. Yarn substitutes: Jaeger Silk 4 ply, four 50 gram balls, Jet Black or Tapestry. Schachenmayer Regia Stretch, four 50 gram balls, Black. Garnstudio Cotton Viscose, four 50 gram balls, Navy, Scarlet Red, or Shocking Pink. Rowan Cotton Glace, four 50 gram balls, Black, Excite, or Passion.
Sizes: Palm circumference: 5 inch / 13 cm (6 inch/ 15 cm, 7 inch /1 cm) Arm sizes adjustable with formula.
Gauge: 32 stitches and 40 rows measured over 4 inches.

Schematics:


Stitch instructions

Simple Eyelet Pattern: Multiple of 8 stitches.
Row 1: (Right side) Knit.
Row 2 and all other wrong-side rows: Purl.
Row 3: *K 6, yo, k2 tog, rep from *.
Row 5: Knit.
Row 7: K2, * yo, k2 tog, k6, rep from *, end last rep k4.
Row 8: Purl.

Faggoting Stitch: Multiple of 4 stitches.
Row 1: K1, yo, k2 tog, k1.
Row 2: K1, k2 tog, yo, k1.

Pattern: In order to calculate stitch count for arm you will have to take several measurements: Circumference of upper arm, wrist, and palm; and length from armpit (or desired length) to wrist.
Multiply number of stitches per inch in your gauge swatch by the number of inches in upper arm circumference and wrist circumference. Round off both to even numbers.
Subtract wrist number from upper arm number. This will be the number of stitches you will decrease between upper arm and wrist. Divide this number by two since you will be decreasing two stitches each time.
Length between upper arm and wrist divided by number of stitches decreased will give the frequency of decreases.
Sample gloves started out with a measurement of 10 inches at the upper arm. 8 gauge stitches X 10 inches = 80 cast on stitches. Wrist measurement was 6 inches X 8 gauge stitches = 48 stitches. 80 - 48 = 32, divided by 2 = 16. Two decreases were made 16 times, and since arm length of sample glove was 18 inches decreases were made approximately every inch.
Circumference of palm gives glove size. Stitch count at wrist may be the same as palm or some stitches may have to be increased.

Right Glove
Arm: Cast on stitches from upper arm number and divide between three needles. Work in K1, P1 rib for 1 inch (2.5 cm). Count stitches on first needle and subtract 4, then divide resulting number by two. Place marker at this point. This is where the Fagoting Stitch "seam" will start.
Work Simple Eyelet Stitch to marker, work Faggoting Stitch, place second marker, then work eyelet stitch around the rest of unworked stitches. Work in pattern for at least 1 inch before starting decreases to establish eyelet pattern.
Decreases are worked on either side of markers. Become familiar with how the eyelets are placed as they are worked so that the pattern stays uniform as stitches are decreased.
Continue to work arm in pattern, making sure you try the glove on to check fit and desired length.
When desired length to wrist has been reached discontinue Faggoting Stitch.

Glove Preperation: Size small is 46 stitches, medium is 48 stitches, and large is 50 stitches. You will have to rearrange stitches on needles: small 23, 11, 12; medium 24, 12, 12; large 25, 12, 13. The largest number is on the first needle with the faggoting stitch in the center as for upper arm. This will make sure faggoting is in center of palm.
Discontinue eyelet stitch on palm of glove (first needle) to ensure that the pattern will line up properly. Line up eyelet pattern on back of hand.
Palm: Work 4 rounds as established, discontinuing eyelet and faggoting stitch on palm and increasing stitches for hand as needed.
Thumb increases: K2, place marker, inc 1 sts, k2, inc 1 st, place marker, work in pattern around. Work without increasing for 2 rounds. Repeat these three rounds until there are 12 (14, 14) stitches between markers, working thumb only in \b eyelet stitch\b0 .
Work in pattern as established until piece reaches desired length from wrist to base of thumb. K2 sts, place next 12 (14, 14) stitches to stitch holder. Cast on 4 sts and work to end of round.
Work hand in pattern as established until piece reaches desired length to base of index finger.
Index Finger: Take 6 (6, 7) sts from palm and 7 (7, 8) sts from back of hand and place remaining sts on stitch holders. Divide the 13 (13, 14) stitches between three needles. Cast on 2 sts between palm and back of hand. Work around in eyelet stitch, lining up eyelets with pattern on back of hand, until index finger is 1/4 inch from tip. *K2 tog. Repeat from * around. Next round-K around. Break yarn, leaving a tail. Thread yarn through tapestry needle and pull through remaining sts and pull tight. Darn in end.
Middle Finger: Take 6 (6, 6) sts from palm and 6 (7, 7) sts from back of hand and place remaining sts on stitch holders. Place the 12 (13, 13) stitches between two needles. Cast on 2 sts between palm and back of hand and pick up 2 sts from cast-on sts of index finger. Divide sts between three needles. Work around in eyelet stitch, lining up eyelets with pattern on back of hand, until index finger is 1/4 inch from tip. *K2 tog. Repeat from * around. Next round-K around. Break yarn, leaving a tail. Thread yarn through tapestry needle and pull through remaining sts and pull tight. Darn in end.
Ring Finger: Take 5 (5, 5) sts from palm and 5 (6, 6) sts from back of hand and place remaining sts on stitch holders. Place the 10 (11, 11) stitches between two needles. Cast on 2 sts between palm and back of hand and pick up 2 sts from cast-on sts of middle finger. Divide sts between three needles. Work around in eyelet stitch, lining up eyelets with pattern on back of hand, until index finger is 1/4 inch from tip. *K2 tog. Repeat from * around. Next round-K around. Break yarn, leaving a tail. Thread yarn through tapestry needle and pull through remaining sts and pull tight. Darn in end.
Little Finger: Take 5 (5, 6) sts from palm and 6 (6, 6) sts from back of hand and place remaining sts on stitch holders. Place the 11 (11, 12) stitches between two needles. Pick up 2 sts from cast-on sts of ring finger. Divide sts between three needles. Work around in eyelet stitch, lining up eyelets with pattern on back of hand, until index finger is 1/4 inch from tip. *K2 tog. Repeat from * around. Next round-K around. Break yarn, leaving a tail. Thread yarn through tapestry needle and pull through remaining sts and pull tight. Darn in end.
Thumb: Divide sts for thumb on three needles, picking up 4 sts from 4 cast-on sts. Work in eyelet stitch until thumb measures 1/4 inch from tip, decreasing as for other fingers.

Left Glove: Work as for Right Glove, reversing shaping by putting thumb increases at end of first needle and starting left index finger above thumb shaping.
Finishing: Darn in yarn ends. Wash according to yarn label and lie flat to dry, pulling arm to length slightly.

Monday, December 07, 2009

Not Dead, Just Brain-Dead

I'm brain-dead and I've been embalmed.

Not much of an excuse for not posting anything new here for at least a year, but other than that I got nothin'. I mean, there's no point in claiming laziness as an excuse.

But I have got ten (count 'em, ten!) new vintage patterns that I posted today and as usual I've got a couple of odd ones since I'm more than a little tired of finding only afghans, baby clothes, and crocheted edging when I'm perusing the internets for free vintage clothes patterns.

So check out the Vintage Pattern List and print some stuff up.

Coming soon: I'm designing some new stuff like I mentioned a few posts back, whatever I said. Yeah, those things.

The Stratford--One-Piece Dress, Hat and Purse, 1933

Ladies Knitted Under-Jacket, 1875

Not really a jacket, but an undershirt. Usually these things are called "vests" or "undervests" or something less likely to conjure up the thought it was meant as an outerwear garment.

Like most patterns of this era no finished size, gauge, or needle size is given. Mmmm, helpful.


Knitted Under-Stays, 1875

Meant to be worn beneath the corset for extra warmth. No finished size, gauge, or needle sizes given and no explanation of how it should be closed in the back. Possibly it was sewn up the back like a tube top and the buttonhole stitching is around the top and bottom edges. The only similar patterns to this I've found thus far have been crocheted out of cotton cord, laced up the back, and were meant to be used as lightweight stays for ladies and children.


Bead Bracelet and Chain, 1863

There was no illustration of the finished bracelet in the book I found this pattern in, but it's easy enough to picture if you read the instructions.

Ladies Knee-Caps, 1885

My only comment is that people's knees must've been frickin' cold during the Victorian days because I've run across at least a dozen different knee-cap patterns for both men and women. You'd think with all the flannel undies, voluminous skirts and petticoats, and woolen stockings that they'd be happy for their knees to get a little breeze now and again.

This one I particularly liked because it looked creepy and orthopedic, and I thought if it was knitted in black it could be part of a Victorianindustrial getup, or it could even drift casually over into steampunk mad-scientist territory. Or something.

Maybe I like these damned things a little too much.

*scampers away*


Ladies Mitt, 1850


Note: I haven't yet tried this one out so I've posted it "as is" directly from the book.

The Lady's Album of Fancy Work
, 1850

Materials—Raworth's crochet-thread Nos. 120 and 90, or black crape silk.

Explanation of Terms.—French ground: six chain stitches united to the centre stitch of former row. Long close: long stitches, without any chain-stitch between.

The receipt for the back of mitten is here given, the underpart and the thumb being simply French ground-work, finished at the top and bottom like the back, leaving an opening at the side for the thumb. Make a chain long enough to go round the wrist in thread No. 90, and work one plain row. Fasten on thread No. 120, and work one treble and row of French ground of six stitches to each hole.—

1st fancy row. 5 holes of French ground, 6 long close, 10 French ground.—
2d row. 5 French ground, 12 long close, 10 French ground.—
3d row. 4 French ground, 6 long close, 3 French ground, 12 long close, 1 French ground, 6 long close, 4 French ground.—
4th row. 5 French ground, 6 long close, 2 French ground, 6 long close, 2 French ground, 12 long close, 4 French ground.—
5th row. 5 French ground, 15 long close, 2 French ground, 5 long close, 1 French ground, 5 long close, 3 French ground.—
6th row. 7 French ground, 5 long close, 2 French ground, 18 long close, 4 French ground.—
7th row. 4 French ground, 5 long close, 2 French ground, 5 long close, 2 French ground, 5 long close, 1 French ground, 12 long close, 4 French ground.—
8th row. 3 French ground, 12 long close, 1 French ground, 5 long close, 3 French ground, 12 long close, 1 French ground, 5 long close, 3 French ground.—
9th row. 3 French ground, 5 long close, 1 French ground, 5 long close, 4 French ground, 18 long close, 3 French ground.—
10th row. 3 French ground, 5 long close, 1 French ground, 5 long close, 3 French ground, 12 long close, 1 French ground, 12 long close, 3 French ground.—
11th row. 3 French ground, 12 long close, 2 French ground, 12 long close, 1 French ground, 12 long close, 1 French ground, 5 long close, 3 French ground.—
12th row. 5 French ground, 5 long close, 1 French ground, 5 long close, 1 French ground, 12 long close, 5 French ground, 12 long close, 3 French ground.—
13th row. 6 French ground, 5 long close, 1 French ground, 12 long close, 1 French ground, 12 long close, 1 French ground, 5 long close, 3 French ground.—
14th row. 5 French ground, 5 long close, 3 French ground, 12 long close, 1 French ground, 12 long close, 4 French ground.—
15th row. 4 French ground, 5 long close, 1 French ground, 5 long close, 2 French ground, 5 long close, 1 French ground, 12 long close, 5 French ground.—
16th row. 3 French ground, 12 long close, 1 French ground, 18 long close, 9 French ground.—
17th row. 4 French ground, 5 long close, 1 French ground, 5 long close, 2 French ground, 5 long close, 1 French ground, 12 long close, 5 French ground.—
18th row. 4 French ground, 12 long close, 3 French ground, 12 long close, 1 French ground, 5 long close, 4 French ground.—
19th row. 12 French ground, 5 long close, 5 French ground.—
20th, 21st, and 22d rows. French ground.—
23d row. 1 plain, 5 long close, 1 plain into each loop.
For the Edging.—1 treble, 1 French ground.—
1st fancy row. 1 hole of French and 6 long close alternately all round.—
2d row. Wholes of French ground, 6 long close all round.—
3d row. 6 long close, 5 chain, 2 long close, 5 chain all round.—
4>th row. Same as the 3d.—
5th row. 6 long close, 5 chain, 6 chain, 8 chain, 6 chain to be worked into the same loop, 5 chain; repeat all round. The engraving will greatly assist in working out this.

Crocheted Watch Fob, 1915

Uhhh, I highly recommend using another fob charm, no matter what this one meant in 1915.

Ribbed Stockings, 1948

Rondo Sweater, 1940s

Another item from Australia, this time from the Patons Knitting Book no. 279. No date, but it appears to be mid-to-late 1940s, since there are no "wartime" ads.

Gorgeous sweater and yet another one on my list of Crap To Do.

1940s Cami-Knickers

Oh look! She really has posted some new stuff, just like she said.

However, I'm being lazy at the moment, and I appear to be in the market for some bifocals sooo in order to not totally eff up the instructions I've just scanned them so they print up all nice-like.

I've knitted up a pair of cami-knickers from a Weldon's pattern a couple of years ago and they're pretty nice under skirts in the wintertime. This set, or another lacy one are on my list of Crap To Do. One day, one day. I should either knit faster, read fewer books, or finish building that time machine.

Cami-knickers pattern from an Australian publication whose title I can't seem to lay my hands on at the moment. Hell. It's the same book that I got the 1940s French Knickers out of.