
Skull Stockings
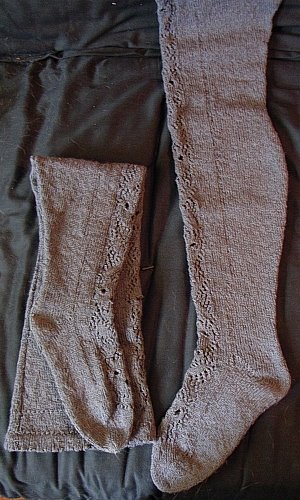
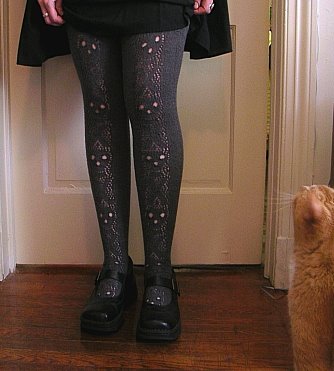
Skull Stockings, 2006
These were designed mostly using the Elizabethan stocking formula found here. Sometimes the link doesn't work so I've got a shorter version posted here, but it doesn't have the nice photos & diagrams. The stocking top is from a 1940's pattern. They also use Sarah Bradberry March's great Skull Lace pattern, but with a few changes in the stitches to help simplify top-down knitting.
I'm posting the confusing pattern I used for size Large (they're a bit too large for me). Using the Elizabethan formula and your gauge you will be able to plug in your numbers and make them to fit pretty much anybody. Posted stitch counts are mostly for illustration purposes. Size can also be changed using smaller or larger needles. Skull Lace pattern can also be applied to the center front any old stocking or kneesock pattern.
8 oz. fingering weight yarn, more or less depending on size (see note below)
Set of 4 size 2 (US) double-pointed needles
Set of size 0 (US) dpns (you will only need three)
One size 6 needle
Stitch markers
Row counter
NOTE: Yarn amount was changed from 6 oz to 8 oz because I used recycled yarn. It was a bit smaller gauge than fingering weight so there would have been more yards per oz with my yarn than with fingering weight. The original 1940's pattern recommended 4 or 5 oz fingering weight yarn, but the size of the finished stocking is much smaller. I just want to make sure you guys buy enough yarn to finish!
Cast-on method previously posted at http://vintagekal.kitchenerbitch.com/: Using size 6 needle, cast on 120 stitches loosely. Knit one row using the size 2 needles, dividing the stitches equally among the three needles. Work 1" in stockinette stitch, then work one row of eyelets: K1, K2 together, yarn over, repeat around. This will be the fold for the picot hem of stocking top. Work 1" in stockinette. Work twisted stitch row: knit two stitches together into the front of stitches but before slipping stitches off neeedle knit together through backs of same two stitches. One decorative row of K1, P1 stitches can be used instead.
Turn the piece upside down and using a size 0 needle pick up the same number of stitches from the cast-on edge making sure they line up with the ones on the first size 2 needle. Do this with all three needles making sure you have the same number of stitches on both sets of needles. Turn up the hem the same way you would have if you were sewing it, with each size 0 paired up with a size 2 and then take your 4th size 2 needle and knit the two sets together taking one stitch from a size 2 & one from the size 0 next to it all the way around until you have all stitches knitted together. You should then have the same amount of stitches you started with and a hem that will stretch and move as much as the rest of the stocking.
Work 2" of stockinette stitch, then one row of either twisted stitches or decorative K1, P1 repeated around.
Stocking top hem can also be sewn down loosely rather than being knitted in. I always manage to sew my picot hems down too tightly and this makes a more stretchy hem. To work sewn down hem work 1" stockinette, work picot eyelet row, then 1" stockinette. Work row of twisted stitches or decorative K1, P1. Omit steps using size 0 needles. Work 2" of stockinette, then either twisted stitches or K1, P1 repeated around. Hem is sewn down when stocking is completed.
Alternate stocking top: Cast on 120 stitches loosely onto size 2 needles, dividing evenly between the three needles. Work K2, P2 ribbing for 1", then work 2" in stockinette, then work one row of K1, P1 stitches.
Lace pattern changes: Print pattern for Skull Lace. Pattern has to be worked upside down and several rows had to be switched around because of this plus number of decreases had to be changed since stockings use only one repeat of pattern. I also only used the repeat on the right--the one next to the numbered rows on the printed pattern.
Trade rows 48 and 50. Trade P2 tog under the three yarn-overs in row 42 with K1, P1, K1 above three yarn-overs in row 44. Change K3 togs in rows 29, 39, 43, 25, 21, and 17 to decrease two stitches instead of three. This keeps stitch count consistant. I also changed purl stitches surrounding skulls and crossbones to knit stitches to make stocking smoother.
First row (Size Large, 120 sts cast on): (first needle) Purl 1 (seam stitch), knit 39, (second needle) knit 10, place marker, start with row 56 of lace pattern (one repeat uses 20 stitches), place marker, knit 10, (third needle) knit 40.
Work decreases approximately every 4 rows, one on either side of purled seam stitch. I decreased to 90 stitches for knee. Work 1" without decreasing, then start increases to calf. I increased to 100 stitches, then worked 1" without increasing. I decreased down calf to 68 stitches for ankle and worked about 2" without decreasing to heel. These numbers will change when using stocking formula and your size and gauge.
Heel: Any sock heel will work. I used something called an "auto heel" from The Complete Guide to Modern Knitting and Crocheting by Alice Carroll (1942). The instructions don't make much sense but it's basically using short rows to form heel. "Arrange the sts. as for the Dutch and French heels, half the sts. for heel and half for instep. The wool should come at right-hand end of heel sts. All first sts. are slipped. P the heel sts. Now work in stockinette sts., knitting 1 st. less in every row, until 9 sts. are left unknitted on each side of small knitted group in center. The last row should be a P row. Turn, and K back along center sts. just purled. Pick up strand between last st. just just knitted and first unknitted st. Place it on left-hand needle, and K this loop with first unknitted st. Turn, and repeat this process on P row, purling the loop and the unknitted st. at end of row. Continue in this manner until all sts. are knitted again. Arrange the sts. for the foot, as for the French heel, but pick up only 4 sts. at each side."
Continue to work pattern on 68 sts until foot measures 2" less than desired length.
Toe: Remove markers and work toe in plain stockinette stitch, making sure there are 34 stitches on lace needle and 14 on each of other two needles. 1st needle (14 stitches)-K to within 3 sts., K 2 tog, K1. 2nd needle (34 sts)-K 1, sl 1, K1, psso. K to within 3 sts, K 2 tog, K1. 3rd needle (14 sts)-K 1, sl 1, K 1, psso, K to end. Knit one round plain. Repeat these two rows until there are 8 sts on lace needle and 4 on each of other two needles. Place the 2 groups of 4 sts together on one needle and graft toe together.


